Showing posts with label photo. Show all posts


"House Finch on Peach Branch"
This photograph is from my "Best Sellers" Collection. 

**********
The first sign of spring is often the bloom of the fruit trees.  During this time, birds can be clearly seen perched among this beautiful backdrop of flowers.  As it gets closer to summer, photographs of birds perched in the trees becomes more and more difficult.

In this photograph, a beautifully colored male house finch, perches perfectly between the blooms of a peach tree.  The reality for each of us is that it is the time to stop and smell the roses as they say.  It is as if all nature is telling us to "look at me!"  I think, honestly, my favorite times of the year are the beginning of spring and autumn.  Although the summer seems to be a better time for water sports, the leaves become dull and the humidity can be smothering.

Thank God for the beauty of early Spring!

Canvas Prints
From
 $65

Metal Prints
From 
$64

Deluxe Prints
From 
$23
GET 20% OFF

ALL PRINTS
OF THIS IMAGE.

3 DAYS ONLY.

USE CODE: AHBUHX
Shop this Image >
Browse All >
Proud member of the Carolina's Nature Photographers Association


Subscribe to My Newsletter

* indicates required


Copyright ©  2020 Matt Cuda Nature Photography, All rights reserved.


"Mountain Lion"
This photograph is from my "Best of" Collection and so far, is my favorite mountain lion image.

First, let me say that mountain lions are incredibly difficult to find in the wild.  Most images, including this one, are taken in captivity.  There are many reasons they are difficult to photograph in the wild, but the biggest reason is the fact that they are so secretive and they are often most active in the evening hours.  Having said that, it by no means takes anything away from this amazing cat.

Mountain lions or cougars have an intimidating look.  They are by nature a dangerous wild animal and should never be approached in a wild setting.  Being and obligate carnivore, it must feed on animals to survive  and that makes them a danger to humans.  Although they are a dangerous animal, they would much rather have a tasty deer than attack a human.     

I think this image looked best as a black and white.  The stark contrast really brings out the eyes, mouth and texture in the fur. The grain in the image helps reinforce the raw, wildness of the cat.  The eyes are fully engaging the viewer and forcing us to almost see his thoughts.  What an amazing animal!

Canvas Prints
From
 $65

Metal Prints
From 
$64

Deluxe Prints
From 
$23
GET 20% OFF

ALL PRINTS
OF THIS IMAGE.

3 DAYS ONLY.

USE CODE: AHBUHX
Shop this Image >
Browse All >
Proud member of the Carolina's Nature Photographers Association


Subscribe to My Newsletter

* indicates required


Copyright ©  2019 Matt Cuda Nature Photography, All rights reserved.


"Elk in Fog"
This photograph is from my Smoky Mountain Elk Collection and so far, is my favorite elk photograph.  

It was a cool September morning in the Great Smoky Mountains.  The kind of morning where I can here every twig snap and every leaf crinkle as I walk along the mountain paths and roads. 

Along one of the meadows, a large bull is making his way up the valley through forest and field.  He is a beautiful elk with well sharpened antlers and one strip of greenery hanging from where he was thrashing earlier that morning.  Only 50 yards away, another bull eyes him carefully and keeps his distance.

It is such amazing time of year as each bull tries to secure his own harem for breeding season.  Sometimes there are clashes between bulls, but I am least guaranteed to see great poses and showdowns each autumn.  In the end this bull was not the strongest or at least most aggressive bull that day, but he was such a great looking animal.

I can't wait to see what is in store for me next year as I explore the Great Smoky Mountains!


Canvas Prints
From
 $65

Metal Prints
From 
$64

Deluxe Prints
From 
$23
GET 20% OFF

ALL PRINTS
OF THIS IMAGE.

3 DAYS ONLY.

USE CODE: AHBUHX
Shop this Image >
Browse All >
Proud member of the Carolina's Nature Photographers Association


Subscribe to My Newsletter

* indicates required


Copyright ©  2019 Matt Cuda Nature Photography, All rights reserved.
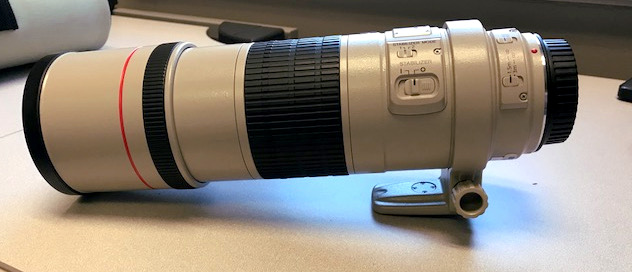
Within the Canon umbrella of luxury(L) lenses, there is a lens which sleeps quietly among a handful of fairly affordable telephotos.  It is a lens which can be used for modest action photography and even as a close focusing butterfly lens.  It has been used by greats such as Arthur Morris and regular Joes across the world.  That lens is the Canon EF 300mm f4 L IS USM.

Canon EF 300mm f4 IS USM

For those that do not know, Canon L lenses are steeped in the tradition of being the best that Canon has to offer.  The telephoto luxury line, in particular, are often easily spotted due to their white or cream colored lens barrel.  Photographers tend to buy these amazing lenses for two reasons.  First, there are those who covet the idea of being in the "L" lens club.  These are the folks that will stop at nothing to own the best lenses Canon has to offer.  I find this, mentality, a parallel to the car collector who accumulates stunning vehicles and parks them in the garage.  These folks don't care about image quality, but just want drooling looks from fellow photographers.  Secondly, serious photographers who want no excuses and want the best of the best in Canon engineering and image quality, collect these lenses regardless of stress on their bank accounts.  These photographers are often pros or semi-pros who can recoup the cost of the lenses by selling and showing their images.

This article, part of a series of articles on Canon L glass, will pick apart these lenses with  real world shooting conditions.  I will start with micro-adjusting the lenses to my Canon 7D Mark II body and end with actual shots taken from the field.  Having shot many lenses over the years, it is my sincere desire to  look at this with an open mind and without the "Canon fan boy" bias.  You can count on this article to be the whole truth and nothing but the truth.


Canon EF 300mm f4 IS
A view of the Canon EF 300mm F4.  The lens comes with a strange looking but functional lens case.

Overall Specifications of the Lens

  • Weight - 2.6 Pounds (1.2 Kg)
  • Length - 8.7 inches
  • Image Stabilized - Mode 1 Stabilizes X and Y axis.  Mode 2 Stabilizes during horizontal and vertical panning. Provides roughly 2 stops of image stabilization.
  • Lens Construction -15 Elements in 11 Groups 
  • Focal Length - 300mm (prime) 
  • Image Magnification - 1:4 
  • Closest Focusing - 4.9 feet (1.5 m)
  • Filter Size - 77mm
  • Built in Lens Hood
  • Removable Tripod Collar
  • Aperture - f4 to f32
  • Street Price - $1,349.00
  • Used Price - $619 to $800

Micro-Adjusting to the Canon 7D Mark II
I think a big mistake some reviewers make is not micro-adjusting the lens to the camera.  How can you sincerely test the lens in the field without making sure the auto-focus of the camera is calibrated to the lens?  With this lens I performed the calibration and it was spot on. So right out of the gate, I know that if the lens isn't sharp, it is not a calibration issue.  Below is the actual calibration shot.


Micro-adjustment/Lens Calibration was not necessary with the Canon EF 300mm F4.  The focus was perfect. 

Build, Fit and Finish
Canon began manufacturing of the 300 in 1997, and it was officially released in December of that year.  In reality it was an upgrade to it's sister lens the Canon EF 300 f4 L (non-is).  Interestingly enough both of these lenses remain in production as of the writing of this article in August 2018.  That's a whopping 21 year run!

Let me say I expected this lens to be built well.  I mean, you have to expect a luxury lens to feel luxurious, right?  Well, yes and this lens did not disappoint me.  First, the aluminum construction of the lens barrel just feels more rugged than lenses like my Sigma 150-600.  I feel that if I dropped this lens it might just recover.  Of course, I would not recommend dropping any lens!  

The 300 has several switches on the side used for turning on image stabilization, setting stabilization modes and setting the focus limits.  They, as expected, felt solid. On the top of the lens near the rear is, in my opinion, a ridiculously large metal plate displaying the name of the lens and who manufactured it.  Some find this an interesting design.  I find it to be one more thing to reflect light and frighten my subject.   Moving toward the front of the lens, I found a feature which I think should be on all prime lenses.  This lens has a build in lens hood.  No need to worry about it falling off or the possibility of it falling out of my back pack.

Being completely honest, I did find several disappointing build issues with this lens. First, the lens barrel is completely smooth.  When I had the lens and body resting on my bean bag, the lens constantly slipped around.  Several times this slipping flushed the birds I was photographing.  Next, I found the white lens to also be distracting to my subject.  When moving my lens, the bright white reflection drew the attention of my subjects to the lens.  This also contributed to flushing the birds.  Next, I did not like that the focusing ring moved so freely.  Because of this design, when resting it on a bean bag, the focus constantly moved as I moved the lens around on the bag. Buying a lens coat for this lens should solve most of the problems with the lens slipping.

Finally, and the biggest concern I had with this lens happened when  mounting it on my tripod.  On my Bogen 3030 head, the clearance between my camera body and the plate was not far enough.  I had to actually remove the battery grip to get it to sit flush in the plate.  Actually, I found this odd since the lens was built in the late 1990s.  This was also when Bogen made the 3030 head and it was very popular.  I suspect as newer Canon bodies were released with battery grips, many people ran into this problem.  This is also a problem with mounting it on a 1 Series body. The tripod foot is simply to far toward the rear of the lens.

Sharpness and Optical Quality
What you are not going to find in this review is a sharpness test pointing at some lens chart.  There are plenty of those available on the web.  What you are going to see is how this lens performs against real subjects.  My working genre in the photography world is wildlife and I specialize in bird photography.  So that is where I will concentrate my tests.  Always stick with what you know when testing a lens.  Since this is a 300mm lens, I think it would be somewhat unfair to test it with birds in flight, so these tests will be on static birds.  Make no mistake though, static birds are still very fast and unpredictable.

The sharpness of the lens was certainly on par with my Sigma 150-600 when shooting at 300mm.  I think this lens may have a slight advantage in sharpness, but it is so close as to not even be something to worry about.  If you are buying this lens strictly for having a sharp lens, then there are more economical solutions out there.

The lens is quite sharp at f4 and I would have no reservations at shooting at f4, but with most lenses, it is a tad sharper at f5.6 and even more so at f8.  This is the nature of almost every lens ever made.  I am sure there is some kind of physics at work here, but that is for another article.


Canon EF 300mm 100% crop
100% Crop of a Common Grackle
Being a lens design of the late 1990s I expected to see more chromatic aberration.  In the shot above, you can see the aberrations around the bird's bill.  This was easily removed in LightRoom and frankly chromatic aberation is of little concern with modern post processing software. Comparing this with my Sigma 150-600, the Sigma has almost no chromatic aberration.


Common Grackle Canon EF 300mm f4 IS USM
Image of the Common Grackle with the Canon EF 300mm f4 L
f5.6, 1/500th of a second, ISO 800

Auto-focus
Although not the fastest auto-focusing lens in Canon's lineup, the 300 can hold its own.  This is especially true when coupled with the Canon 7D Mark II or a 1 Series camera.  The focus was right on in most cases.  Perhaps when compared with the 300 2.8 the auto-focus is slower, but for most people I think it is more than adequate.  I did find, however, it did tend to hunt a bit too much and liked to grab the background.  This can be remedied by using the second auto-focus case on the 7D Mark II or 1DX Mark II.

There are two modes which can be used to help achieve faster auto-focus.  There is a focus limiter switch on the side which can be switched from 1.5 meters to infinity or 3 meters to infinity.  See the image below to view the switches. Essentially, you would use the 3 meters to infinity when shooting birds in flight or animals at a greater distance.  This will keep the lens from hunting as much.  In my case, I was shooting quite close, so I kept it at 1.5 meters to infinity. 

One very strange problem I had occurred when holding down the auto-focus button (I use rear button auto-focus) on AI-Servo and firing in burst mode.  I noticed that the burst rate on my Canon 7D Mark II actually slowed down to what seemed like 6 fps or there about. I never did remedy this problem.  This problem does not exist when my Sigma 150-600 is mounted.  I am probably going to check with Canon on this and see what they say.


House Finch taken with the Canon EF 300mm f4 lens.
f5.6, 1/320th, ISO 800

Image Stabilization (IS)
Image stabilization is provided on this lens, but it is an early version of IS.  Because of this, expect to only get about 2 stops better low light performance.  Because it is an early version, you can also expect louder mechanical sounds coming from the lens when it is engaged.  Because my testing was done resting the lens on a bean bag, I couldn't fully test this feature, but it performed well for me at 1/250.  I suspect you should be able to get down to 1/60th or 1/125th of a second without issue.  Remember though that it only stabilizes your hand holding.  Subject movement can still produce blur in your images.

As with all Canon IS, there are two modes of operation.  Mode 1 stabilizes both the vertical and horizontal axes while mode 2 only stabilizes vertical movement of the lens.  All my tests were performed with mode 1 engaged.  If you want to pan with a bird in flight, then you would selected mode 2.


The Canon EF 300mm F4 IS USM has two modes of image stabilization(IS). Mode 1 was used for all of my testing.

Uses for this Lens
One of the most obvious uses for this lens is wildlife photography.  What makes a good wildlife lens is sharpness, great auto-focus and focal length.  This lens is sharp and has good auto-focus, but may not be the ticket if you are a bird photographer.  For static bird photography, I believe it will be fine, but for those who spend a great deal capturing birds in flight, it will, in many cases be too short.  Now, I am not saying you can't photograph birds in flight with a 300mm, because you can. I used a 300 for several years before upgrading to a 600mm.  It is just not an ideal solution for flight photography. 

Although I did not test its close focusing capability, this lens is known for it's ability to do so.  It focuses so closely in fact, that it is used by butterfly photographers to get more distance from the subject.  For that capability, I can recommend it as an insect lens with the one exception that it is not a full macro 1:1 lens.

Next, I think the lens would be fine as a general purpose medium telephoto.  It would be a good lens for your children's sporting events, for example.  The focusing is fine for fast moving subjects, although most likely not as fast as say the 600 f4. I could even see this lens being used for picking out a distant landscape feature.  


Final Verdict
Let me start by saying that you really can't go wrong here.  This lens, although long in the tooth, does what it is advertised to do.  It is a great all purpose lens that is well suited for most subject matter requiring a medium telephoto.  But that might also be its greatest weakness.  As with other primes, you must buy more primes in order to fill in the gaps.  You could easily spend 8 or 10 thousand on a set of primes that (for all practical purposes) could be handled by one zoom lens.

However, those big zooms like the Sigma 150-600 are not fast glass.  This lens, at an f4 aperture, could still be used to supplement in low light conditions or flight shots with a triggering device.  For that reason, I might consider a lens like this in my future kit, but let me reiterate that I would not use this as my primary birding lens.  I hope that Canon soon comes out with a version II of this lens to address some of the optical and IS concerns.

Let me take a bit more time to write about using this as a birding lens.  Remember, you only working with a 300mm focal length.  On my 7D Mark II that equates to a 480mm effectively (due to the 1.6x crop factor).  Even at 480, I had to get quite close to the birds and sometimes that can flush the more skittish species such as woodpeckers.

Where I think this lens really shines (no pun indented) is taking advantage of the f4 aperture and shooting birds in flight with an IR trigger.  This would allow higher shutter speeds up up to 1/5000th of a second.  To capture songbirds in flight, you must use a high shutter speed or use a very short flash duration.


Quick Summary
  • Great build quality
  • Image stabilized
  • f4 aperture makes shooting in lower light easier
  • Sharpness is fine
  • Adequate to above adequate auto-focus, but could be better.
  • Decent price considering it is an f4 L lens
  • Built in lens hood
  • White color could draw unwanted attention from your subject
  • Focusing ring was great when hand holding, but slips when on a bean bag
  • Smooth finish was slippery on a bean bag mount.
  • Slower burst rate in AI-Servo?  Was this the lens or the camera?

Check out the video companion to this article:


Announcements:
Check out the latest podcast episodes 
I need your help to keep producing content! Consider becoming a patron to my work. Funds received from your help, will go toward keeping the infrastructure in place to keep providing free content. As you know, web site hosting, microphones and recording gear are very costly. To find out more about being a patron and how this can benefit you, head out to my Patreon site : https://www.patreon.com/mattcuda 
Individual training, and honest and useful portfolio critiques available. Email me at matt.cuda@mattcuda.com

______________________________________________________________________


My Website: http://www.mattcuda.com


Patreon: https://www.patreon.com/mattcuda


Stock Images: https://www.artvisions.com/cuda/


Newsletter

http://www.mattcuda.com/Home/Newsletter

To purchase any of my prints please use the following link:

https://www.artvisions.com/cuda/

You may also contact me directly to purchase prints: matt.cuda@mattcuda.com


FORSYTH COUNTY, NC - For many people, a trip to an exotic location to photograph animals is just not economically feasible. For those in this category, I can greatly sympathize with you. But do not dismay, there are some very nice zoos and rehab centers throughout the United States to help you in your quest to photograph exotic animals.

What Zoo is Best
There are approximately 500 zoos in the United States, but be careful. Not all these zoos are created equal. It is important to check these zoos out on the internet before you step foot in one of them. I like zoos which are good to their animals by offering them good medical care, food and plenty of places to roam. In North Carolina, the best zoo would be the North Carolina Zoo in Asheboro, NC. If you are looking for a zoo for comparison purposes, this as a gold standard.

Next, make sure the zoo is photographer friendly. Some zoos, like the Atlanta Zoo have stipulations about not using photographs made of "their" animals for commercial purposes. I refuse to give these zoos my money.

Camera Gear
Zoos can offer a unique challenge to the photographer from an equipment perspective. Some zoos, for example, do not allow the use of tripods and so you can only use mono-pods. This is not a deal breaker, but could make some shots nearly impossible. Below is the gear I recommend and how to use each piece. There are links scattered throughout to show examples.

  • DSLR or comparable mirrorless camera - The important consideration here is that the camera has interchangeable lenses and has a megapixel count over 10mp. If you only have a 300mm lens, I recommend the APS-C sensor size. An example is the Canon EOS 7D Mark II or on the mirrorless side the Sony A6500.
  • Medium Telephoto Lens (200 - 300mm range) - it is crucial to at least have this much glass in order to frame the subject in creative ways. In some cases you will be able to fill the frame, but with subjects greater than 20 feet away, you will need to step up. The Tamron 70-300 SP VC is a good, inexpensive lens in this category.
  • Super Telephoto Lens (400 - 800mm) - For zoos and just about any wildlife, I like versatile glass and for me that is the Sigma 150-600 C or Sports version. This covers just about every scenario during a zoo visit. I can shoot shots of small songbirds in the aviary all the way up to tight portraits of a black bear.
  • Macro Lens (100mm to 180mm) - although not a must, having a macro lens will allow you to capture shots of small frogs and reptiles. Furthermore, you can get close shots of the flowers which often decorate the entrances and pathways to the zoo exhibits.
  • Sturdy Tripod - When you find yourself inside a building trying to shoot through terrarium glass, having a tripod is a must. Even with modern image stabilization, there are times you simply cannot get a good, stable shot without one. It really depends on the zoo and how much of the exhibits are indoors. I recommend Manfrotto as a good, inexpensive tripod.
  • Black Rapid Strap or Similar - carrying a 600mm lens through miles of zoo can be tough on the old shoulders and back. This strap will make it much easier to shift the burden a bit from your shoulders. It also allows the photographer to easily put the camera up to his eye because the camera slides along the strap.
  • Comfortable Pack - find a pack that does not cause your shoulders to hurt too quickly after putting it on. You should be able to walk a good hour without having pain. Check out the Moose Peterson MP-3!
  • Good SD, CF Cards - buy good CF cards! I use SanDisk Extreme 32 Gig cards. They are fast enough for video and are very reliable.
Shot List
Below is a list of shots I have taken or shots I look for on a typical zoo visit. Hopefully they will help you pick shots that you want to take next time.

The Close Portrait - the zoo is the perfect place to get close shots with some real feeling and energy. Some of these shots just do not happen often in the field. Below is a shot of a black bear. In this shot, you feel like you can actually see into his soul. This is the shot that presents itself the most.


Environmental Shot - this can only happen at large zoos where the animals have plenty of place to roam. Look for places where there are no bars or fences in the background. Below is a shot of a Rocky Mountain elk bugling. Honestly, I wouldn't know this was in a zoo, if I hadn't taken it. It has an ear tag, but they do this in wild at times as well.


Animals Interacting - this one is tough, but not impossible at the zoo. Look for animals which are social and interact in large groups. A typical animal with this behavior is the baboon. Below, a mother baboon is keeping a young one in check.


Animals in Action or Showing Gesture - in this scenario, we have a single animal that is doing something unusual. Perhaps it is an elephant running or in the case below, a king eider showing off for the female eiders.


In conclusion, I think you will agree that the zoo can be a great place to enjoy animals, test your gear and learn how to make better images without spending 4,000 dollars on a trip. The beauty is that after all this practice in zoos and rehab centers, you will be ready when you do go on one of those once in a life time trips!


Now get out there and enjoy nature (even at a zoo) !

God Bless,

Matt Cuda


Announcements:
Check out the latest podcast episodes
I need your help to keep producing content! Consider becoming a patron to my work. Funds received from your help, will go toward keeping the infrastructure in place to keep providing free content. As you know, web site hosting, microphones and recording gear are very costly. To find out more about being a patron and how this can benefit you, head out to my Patreon site : https://www.patreon.com/mattcuda
Individual training, and honest and useful portfolio critiques available. Email me at matt.cuda@mattcuda.com

______________________________________________________________________

My Website: http://www.mattcuda.com

Patreon: https://www.patreon.com/mattcuda

Stock Images: https://www.artvisions.com/cuda/

Newsletter
http://www.mattcuda.com/Home/Newsletter

To purchase any of my prints please use the following link:
https://www.artvisions.com/cuda/

You may also contact me directly to purchase prints: matt.cuda@mattcuda.com