As 2014 is drawing to a close it is once again time for me to select my top ten images of the year. This exercise has become an important part of my photographic tradition and process as it helps me to see where I have been over the last year and how much, if any, I have progressed. This year has given me several fun and interesting opportunities to photograph birds and that will be reflected heavily in my selected images.  Once I considered myself more interested in landscape photography but now I am moving quickly into becoming a wildlife photographer.  The beauty that God has placed into these creatures is beyond amazing and I love to capture that beauty whenever possible.
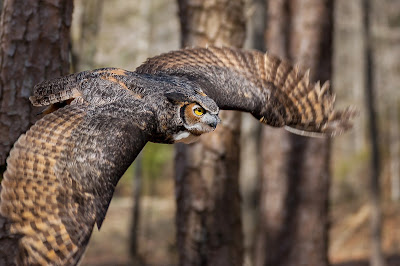
#1 - Great Horned Owl in Flight.  If you have followed me at all you have seen this image plastered all over my social media and public web site.  I love this image because it represents first, my favorite raptor species and second because it is in a wooded environment in flight as it normally would be seen in the wild.  The out of focus feathers in the foreground and background help to emphasize motion and speed.


#2 - Cardinal in Golden Light.  Late afternoon light is my favorite type of lighting for almost any natural subject.  Here, a male northern cardinal faces the golden western light pouring in just before the sun falls below the tree line.

#3 - Tribute.  Perhaps this image is tied too much into my own sentimentality of the great memories of going fishing with my grandfather and brother, but I do find this an interesting departure from my normal subjects.  I went black and white with a touch of sepia in the final image.


#4 - Eagle in Quarter Pose.  This eagle decided to give me a bit of a show so I took full advantage of it.  She has a very intimidating and proud look which is accented by her wings spread out just as one would expect to see on the back of the US quarter or as seen in ancient Roman culture.  It is no wonder so many cultures use the eagle as a symbol of strength and courage.

#5 - Pine Forest.  This is a photo that appeals to me at both an artistic level and as a symbol of North Carolina, my current home.  At an artistic level, I love the symmetry of the pine trees and the converging lines which they create.  In the distance the converging trees disappear into early morning fog giving the scene a sense of mystery.  On the practical or historic side of the equation, these trees reflect the nature of the forests throughout North Carolina which are in some areas completely covered with various pine trees.

#6 - Indigo Bunting.  The bunting makes number six in my list not because it is an awesome composition or that I performed some amazing work of photography, but because of the mind numbing beauty of this species.  What an amazing work of God to produce such an stunning, iridescent bird. In fact this bird has no blue pigment in its feathers but when the sun strikes the feathers it reflects blue due to iridescent qualities in the feathers themselves.  Note how quickly the shadow falls to black on the shadow side of the bird because the single light source shining in at such an acute angle cannot produce the same level of iridescence in the feathers.

#7 - Titmouse in the Snow.  The gregarious titmouse is one of my favorite songbirds and here it is shown perched in a  rare North Carolina snow "storm."


#8 - Mississippi Kite.  This images appeals to me because this raptor appears almost ghost like as the sun pours through its open wings.  I used fill flash to compensate for the loss of light on the side of the bird facing the camera.


#9 - Short Eared Owl.  This image was taken as part of a fund raising event at a local raptor rehabilitation center, but I like it first because it has an almost studio like portrait feeling which is not often attained shooting wildlife and secondly because it is a species that would be impossible for me to photograph in North Carolina.  The cattails lend to the notion that this bird is a ground species of owl.


#10 - Chilean Flamingo.  It was a tough call to make between this image and the red-bellied woodpecker but in the end it came down to liking the flamingo based on art rather than color.  Although the flamingo is a very colorful bird I like this image first because the neck of this bird forms an almost perfect "S" shape and second because of the eye peaking out behind it's fluffed out feathers.


Well, that's it for 2014 and I enjoyed it to the fullest!  Thanks to my family and for putting up with my at times obsessive hobby.  Keeping photography balanced with my relationship with God and family remains a challenge and I will continue to improve that balance within the coming year.   There is more to come in 2015, Lord willing and the creek don't rise.  Have a happy new year!
This month Canon unveiled it's latest iteration of the 7D called the 7D Mark II and it is making quite a splash in the photography community. Many photographers, dreaming of the latest gear, will rush out and purchase the 7D Mark II and sell their existing gear to KEH or online at auctions sites such as Ebay. This will cause a sudden flood of used 7Ds into the market space and begin driving prices down. For those of you who work on a budget when it comes to buying camera gear, now is a good time to look at the Canon 7D on the used market and some deals which exist for current 7D inventory on the new market.
I purchased my used 7D from KEH, Inc., located in Smyrna, Georgia, USA and highly recommend them as an excellent source of used gear. This camera augments and replaces in some respects my Canon 1D Mark II which is still and excellent camera and will serve as a backup for the next several years.  The tests I conducted in this review are my personal feelings about the camera in the field and do not use any scientific charting and testing.  There is plenty of that material already available on the internet and would serve no purpose for me to simply reiterate what has already been said.  Primarily I am a bird photographer, although I do enjoy other nature photography as well and so this review will reflect that interest. 
Before setting up for the shoot I wanted to get the overall feel for the camera body.  I found it to be of solid construction and would fit well in most anyone's hand.  It is made of a magnesium alloy wrapped in rubberized like material and seems very well built.  The button placement is ergonomic and comfortable, but I did find that some of the buttons need to be tapped more than one time for them to work properly.  This might be the camera's age, but I thought I would pass it along anyway.  The viewfinder is bright and uses a  modern LCD technology to actually "paint" the focusing points and grid-lines onto the viewfinder.  That's right, I said "grid-lines."  There is simply no need to go out and buy additional focusing screens in order to view the grid-lines.  That was the first bonus I noticed.  
I continued my shoot by attaching the camera body to my faithful Bogen/Manfratto 3221 tripod and mounted my trusty Tamron 70-300 SP VC lens to the body.  This combo was sitting in my blind which is no more than 8 feet from the perch I use when photographing small songbirds. The morning of the shoot was cool and partly cloudy, but rays of light, at times which illuminated the birds at random times.  My exposures were generally around a 1/200 shutter speed, 5.6 aperture, and ISO 400/640.  I had attached a remote release to my camera and set the motor drive on high.  The 7D is capable of about 7 to 8 FPS with raw files and I found this to be a real plus here to get bursts of images with the birds in various positions.
 I was able to shoot several species of birds on this morning, and at the end of this article you can see two which I think turned out fairly well.  My biggest concern on my first shoot with this camera was determining how the noise held up when using 640 and 800 ISO settings since my Canon Rebel T3i had such disparaging results.  All I can say is DO NOT listen to those online that claim this is the same sensor as the Rebel series made during this time.  This statement is simply not true and Canon is on record saying it is not the same sensor.  This camera does produce noise but it is very manageable by simply overexposing by 1/2 stop and using a bit of noise reduction in Light Room.  Furthermore, the noise seems to have a very tight pattern and very similar in most respects to my 1D Mark II if not better.  Is it going to be noise free at 1000 and 1600 ISO?  No, of course not, but It is manageable and very doable to shoot at 1600 ISO by shooting to the right(overexposing).  With this sensor, under no circumstances should you underexpose your image.  It does not have the latitude to push in post without noise issues.  Know this camera and understand how it can best best be used and you will be fine.
This first test did not go into auto-focus but perhaps I will do a followup post on how it handles in the field with birds in flight.  I want to finish up with a couple additional features I liked. One I found to be useful was a dedicated "auto-focus on" button (back focus button) which can be configured to do all the focusing and disconnect focus functionality from the shutter button. On my 1D Mark II I had to configure another button do to this duty. Next, live view is a dream to use but I did find that the battery life  was quite short so I will need to buy a second battery soon for live view work.  I like to use the live view feature when I am photographing skittish birds like woodpeckers.  I can completely cover up the camera and myself and use live view as my eyes. Finally, I liked the micro-adjust for lenses which have back focus or front focus issues, but I have not tested this yet.  
I hope you found this post useful and watch for future posts on equipment, wildlife and my photography in the future.


You are setup in a place where the wildlife is very close and moving at high speed. You have very little time to react, so you pick up the camera and try to use your focusing points to get a good focus lock on the subject and begin to fire away. In only a moment's time the subject is in your frame and gone. With great anticipation you scroll through the series of photographs on your camera's display only to find that none are in focus. What happened? You have the best camera made and yet none of the shots are in focus. The answer is that cameras simply cannot lock and follow a subject that is that close to your camera and moving at such a great speed. Had the subject been farther away your camera would have had time to lock and use predictive focus. So how can you handle this situation?  How can you take home the winning shot?
Many new photographers may look at me with a very blank look when I use the term "zone focusing."  Zone focusing is simply pre-focusing your camera in a spot on the ground where the subject will eventually move through the scene.  There are times where there are too many distractions or the subject is too close for your auto-focus system to lock onto the subject or lock onto the right subject.  It may try to find a lock on a tree or the ground before it locks onto the fast moving subject.  No matter how advanced your camera's auto-focus system is there are times where you must use zone focusing.  So how exactly do you zone focus?

There are two ways to pre-focus your camera, but only one will work with any camera.  The first is used for cameras which do not have a button dedicated to focus or are manual focus cameras.  First, you should switch your lens to use manual focus.   After switching to manual focus, find a spot on the ground within the path the animal or person will be moving. Now change your camera's drive to use as many frames per second as it can handle.  My Canon 1 Series can shoot at over 8 fps which makes it ideal for zone focusing, but any camera can capture the action even cameras as low as 3fps. Next, as the subject moves into the the spot or zone you have focused on,  hold down the shutter button and let the camera fire off as many frames as it can.  Release the shutter button as soon as the subject is past the area where you focused.  That's pretty much all there is to it.  Some of it is just a matter of luck based on the speed of the subject and how many frames per second you can fire off.  Hopefully this will help those who are struggling with photographing a subject in difficult auto-focus conditions and for those still using manual lenses this is about the only good way to capture action in my opinion.  This technique does take some practice to know just how far out to focus based on the distance and size of your subject but it can be mastered quite easily.


This great horned owl was captured using zone focusing. He was  simply too close to accurately track using even a modern Canon 1 Series camera.
Introduction
I have been using my trusty Canon 70-210 EF F4 (1987) zoom for a couple years and was looking to upgrade to a lens which has some form of vibration control as a feature.  Not only that, the Canon 100-300 EF I own is a very poor performer on the 300mm side.  I needed a lens that not only offered VC but also had the image quality at the longer end of the zoom range.

The Search
My search started, as do most searches, on the internet.  I read review after review and lens test after lens test.  There was a great deal of interest on my part with the Canon 70-200L F4 on just its reputation alone so that was an obvious choice for me.  The price of this lens ended up being about $200.00 more than I was really wanting to spend and this lens required a teleconverter to get to the 300 mm range I wanted to attain. By the way, the IQ of the 70-200 is amazing without a doubt, but the older version does not have image stabilization so I had to rule it out completely.  The rejection of this lens led me to the Canon 70-300 EF (non-L).  I read some great reviews but in the end I ruled this one out because of issues Canon was having with the IS when going vertical and the lack of full time manual focus.  I shoot a great many vertical shots and this was not acceptable.  I know that Canon will fix this at no charge but I did not want the hassle.  Finally I came across reviews stating how great the Tamron 70-300 DI VC was in both image and build quality.  Throw in the fact it also had full time manual focus and I was sold.  As soon as I got the funds together, I ordered a used model from KEH and thus began my journey with a 3rd party lens.  I will go through several sections including unboxing and the features of the lens then conclude with tests of the lens in the field.

Unboxing
The box arrived from KEH well packaged as usual. KEH is an amazing store for used camera gear and their customer service is top notch.  A first look at the Tamron lens revealed that it was larger and heavier than the comparable Canon lens. As with many modern lenses, the lens hood is tulip shaped and mounts in reverse on the lens when not in use.  The front element is a large piece of glass with a filter diameter of 62mm.  Because of this filter size, adding a polarizer could get a bit pricey, but for me this is not a reason to not buy a lens. The lens has a manual focus ring, a switch for turning on vibration compensation (VC) and one for switching to autofocus or manual.  Zooming is controlled by another ring at the front of the lens.

Features
The manual focus ring is heavy duty and is smooth to operate.  This lens has a feature called full time manual focusing which is often found on higher quality lenses.  What this means is the photographer does not have to flip a switch from autofocus to manual in order to focus the lens manually.  To some this may not be an important feature, but I am a bird photographer and many times I don't have time to flip to manual or adjust my autofocus points to get the shot.  Full time manual focus allows me to get the shot without frightening the subject.

Next, this lens has what Tamron calls vibration compensation (VC) which is their term for image stabilization (IS).  With the flip of a switch located on the side of the rear of the lens the VC is engaged.  VC will not help you if you are dealing with a moving subject since that is a concept called subject blur.  It will only help to shoot at a slower shutter speed with still subjects.  This happens more often for me when shooting animals or birds.  Often a bird is perched quietly in a tree in early morning but the light is too low to get a fast shutter speed.  This is an example of a perfect solution for this feature.  Photographers should note that you must turn this feature off when using a tripod and I have not tried it with a monopod.  Also note that VC will automatically detect panning to disengage the feature during the pan.

The zoom ring is top notch and I noticed no zoom creep.  I was especially impressed with this since it was a used lens.  I did notice that it took a couple seconds to fully zoom but this is a problem with the modern, non-pump style lenses.  Given enough time, I might get used to this and my speed improve.

Field Tests
First, let me just say that I am always skeptical of 3rd party lenses.  Not because they are horrible lenses but because of all the bad reviews on quality assurance.  Before starting the image analysis I can honestly say that first and foremost the quality of this lens is awesome.  With that in mind let us get down to doing some real tests.

There is a local organization in the Lake Norman area of North Carolina called the Carolina Raptor Center.  Each year they have special days when they close down so professional and advanced amateur photographers can come in and take photographs of the birds in their natural environments without being attacked by mobs of anxious tourists.  This event will be the backdrop for my field testing.  All of the test shots created at this event were created with the Tamron lens coupled to a Canon 1D Mark II.

I began shooting at around 10 in mostly open shade locations, handholding the camera with VC turned on. This shot below of the American Barn owl was shot at 1/200, 300mm, F8.  The sharpness of this lens is phenomenal at any price, but for a $280.00 used lens it is unbeatable.  Even at F8 my consumer grade Canon lens cannot match this. My Canon 1 Series camera has a 1.3x (1.255) crop factor and I noticed no issues with focus in the corners or center.  I am sure there was some degradation but  it was well under control.  The chromatic aberrations were minor and easily corrected in post processing.


American Barn Owl Tamron 70-300mm VC, 1/200, F8 at 300mm

This first image, although probably still hand holdable by some, to me should not be attempted at less than a 1/500 of a second shutter speed. The VC gave me the confidence to go a stop or two lower.  The next shot of this Eastern Screech Owl was shot at a much lower shutter speed of 1/100 of a second at F5.6.  This I know would not be possible for me at 300mm with a non stabilized lens.  I did use some fill flash here so some motion might have been stopped by that but not that much.  It was pretty low powered fill.

Eastern Screech Owl - Tamron 70-300 VC, 1/100, F8 at 300mm
Now, here is the bad news for me on the vibration compensation and why I have a hard time fully recommending it.  For my shooting needs I rarely got good results at greater than 1.5 stops.  Part of this I believe is because of the really heavy Canon 1 series body I use which was causing me to tire and the other problem is that the VC only holds while you have the shutter pressed halfway.  I don't know of a better way they could have designed it but it forces to the photographer to have to worry about both focus and making sure the VC has engaged and has locked down the image.  As you press the shutter down, the VC will attempt to stabilize the image and will visibly lock into place when it has the image vibration under control.  As I continued to tire throughout the day, it became harder to stay still and keep the lock in place.  This is the best way I can explain this and I might not be doing the lens justice by explaining it this way, but this was my feel or impression.  Having said all the negative, it was still a joy to have in place and ready to help me out.

Finally the lighting got a bit better and I turned off the VC.  The following image shows just how sharp this lens can get and why I highly recommend it for its image quality at 300mm.  The Bald Eagle below was shot at 5.6 and it is tack sharp.  At F8 I would not be surprised if the quality rivaled some of the expensive "L" quality glass.  I did find the contrast was a bit low and I had to crank it up in lightroom, but this is a minor issue to me.  If I was shooting slide film back in the 90s it would be an issue, but not in todays world of digital processing.

American Bald Eagle - Tamron 70-300 VC, 1/400, 300mm, F5.6
Before concluding I wanted to say a word about autofocus on this lens.  It was good but not great.  I put it up against close flying birds and it failed horribly but then again most lenses would have difficulty tracking close.  It did quite well on stationary birds and I noticed no problems with back focus or front focus.  The focus is sharp and that is really all I need to say.


Conclusion
In my mind Tamron met and in some cases exceeded my expectations.  The lens is built well, has good autofocus and decent image stabilization.  I highly recommend that anyone pro or consumer buy this lens.  You will not be disappointed.

To find out more about me and my photos visit me at :
https://www.flickr.com/photos/44128780@N08/with/13339006364/

To download full sized images go to:
My latest images for sale at Shutterstock:


My most popular images for sale at Shutterstock:


So I am  writing this post in hindsight after having a couple days rest and having time to contemplate my first 5K race. The race I completed, the Cougar Challenge, is a 5K to help support Calvary Baptist Day School in Winston-Salem, NC.  The event was held at the Bermuda Run Country Club just outside of Clemmons, NC and was open to anyone who wants to run.

Preparation for the Race
Oddly enough, because of several issues I have with my joints and shins, the only preparation I did came in the form of the treadmill.  I would run three days a week, each day getting progressively more difficult.  Mondays, would normally be a one mile walking warm-up followed by a 5K flat run.  Next, on Wednesday, I would usually take it up a notch by running 5 to 6 miles flat, with no incline.  Fridays were generally free for all in the sense that I could either do some hill training or run the 5K for speed.  During this training period I increased the intake of energy foods (eg. oranges) and fluids. In training I was never able to run the 5K faster than 29 minutes, but for someone who weighs 237 lbs this is probably pretty decent.

The Week Leading up to the Race
Unfortunately about a week and a half before the race, I was hit with what I believe to be a virus.  The doctors still do not know what I have but it is sapping my energy and causing me to sleep quite often.  So the week before the race I only got one run in and only ran 5K on the treadmill. On the day of the race I got up early, drank about 24 ounces of fluid and drank a protein shake instead of a meal.

The Race
First, since this was my first race, I had no idea what to expect beyond what I had read on the internet.  The morning was cool, so I wore my windbreaker over my sleeveless running shirt. I wore shorts with a spandex type of short under the regular shorts.  I have found the tight spandex greatly cuts down on chaffing and I highly recommend it as underwear for running.

Next, because it was so cool, I had to stay warmed up so I walked the parking lot and did some very slow jogging.  Just enough jogging to keep the blood flowing without causing me to breathe harder. After I felt my body was warmed up, I did some basic stretches to get my Achilles tendons stretched out.  I do this because this is generally where I have the most pain and lack of flexibility. I do not recommend stretching until you have warmed up the muscles and tendons thoroughly as this can result in a muscle tear.

As the race approached we all started to line up at the starting line. I threw my jacket behind a tree and checked my racing bib to make sure it was still fastened properly.  There were many different age groups present from 6 to 60 years old.  I lined up slightly toward the back since I was not sure how fast this group was going to be and it is considered poor runners etiquette to line up in the front if you are slow or unsure of the speed of the racers involved.  In a 3 mile race there is plenty of time to think about pace and passing other runners.

Finally, the horn sounded and we were off and running.  I was tucked into a pretty large group of people and it became difficult to find a pace and line to run in.  I guess this is the disadvantage of placing yourself back too far in the pack.  After about a quarter mile we hit our first hill and this caused everyone to break up.  The slower and untrained began to walk, while the rest of us kept some kind of running pace. I was able to find some daylight and break out a bit at this point.  Since this first hill was so early in the run, I had no real difficulty running it at at just a slightly slower pace.

The race continued and the course flattened out a bit.  This gave the runners a little breather, but the rest would be short lived.  Another hill was just ahead.  I could see the hill coming way ahead of time so I throttled back my pace a bit to help my heart and lungs recover. I knew as soon as I hit the incline, my heart rate would increase and I would risk getting winded.  This hill was not awful but it was long and keeping my heart rate low was difficult.  As I approached the summit, I knew that I would get a breather on the other side and was greatly looking forward to it. Just as I crested the hill, I saw the hill slope downward followed by another hill on the other side. At this point I began to think more about finishing without walking than finishing with a great time. I knew now that it was going to be a very hilly course.

I pressed on and passed a few folks here and a few folks there, but generally I had found a pace and so had everyone else. I was now about two miles in and I was feeling it.  My quads were starting to feel tired from all the hill climbing and my lungs were constantly being challenged.  I had  my iPhone with me also tracking my progress and when I hit the second to last hill at about 2.5 miles in, I was really feeling it.  I wanted to stop and walk badly but I would not allow myself.  I began to pray for strength like I never had before while running.  At times on the hills I don't know how my legs kept churning.  Finally, I could see the home stretch ahead and yep, you guessed it, another hill.  Not a bad hill but at this point in the race I was hoping for it to be flat so I could open it up.  I rounded the last corner on the hill and finished the race at 32 minutes and some change. I met my goal of not walking and had completed my first race.

Conclusions and Lessons Learned
The treadmill can be used as the sole training platform but it will not fill in some of the gaps such as effects of pavement on the joints and muscles and propelling yourself forward rather than propelling yourself along a moving belt.  It did adequately train me for the event but I would recommend running once in a while outside. Hill training is crucial when confronted with a course like this. Unfortunately I had never raced this course and could find no information on it online.  My feeling is that you should heavily train for hills three weeks before the event.  If you don't, you will never be able to run a competitive pace on a hilly course.  Considering the challenges before and during the event I am happy with my performance.  I think the overall winner came in somewhere around 20 minutes.

As far as my impressions of the course, I had mixed feelings.  On the one hand, the roads were well maintained and little traffic, but on the other hand, I really did not care for all the hills.  I felt like the hills were too challenging and caused me to run much more conservatively.  Had the course had more flat sections it would have allowed me to open it up and have a little fun. Furthermore, the actual finish line was on the summit of the hill, so the spectators could not cheer you on as you ran the last half mile. This made the finish rather anticlimactic to say the least. Of course I could just have easily turned that around and said that I was not prepared to run the hills and it was no fault of the course layout.  The bottom line is that I had fun and it was for a great cause.  Hey, if a fat 40 year old can do then you can too!


Now that I am into 2014, I am formulating my plans for taking my bird photography to the next level.  2013 yielded some good results but that was mainly the setup of a backyard birding test studio. This year I have plans to upgrade the bird studio and do some additional field work.  Below I am outlining how I will proceed.

UPGRADING THE BIRD STUDIO
In 2013, I had a single perch setup designed for the small species of birds commonly found around feeders.  There were plenty of Titmice, Sparrows and Finches.  Although I love these birds I want to expand into two separate perches this year to take advantage of several different types of birds.  

Large Woodpecker Perch 
Part of my experience in 2013 showed that we do have a fair population of woodpeckers and similar birds which feed on suet.  The perch will involve a larger vertical tree trunk supported on steel pole.  On one side, I will attach the suet feeder and drill holes for on the opposite side of the camera view to pack with peanut butter and seed.  I had some good luck with this approach in a test environment but my materials were a bit flimsy.

Building an Owl House
Largely this is an experiment, but hopefully I can attract some Screech or Barrow owls to nest.  Many time these houses are taken over by other critters such as squirrels but we do have a large rodent population here and good forest edge so I am hoping we may see some nesting.  Should this be successful I will attempt to do some remote photography of the owls.

Hummingbird Feeder Perch
In 2013 I was completely shocked by the population of Ruby Throated Hummingbirds we had.  I and my daughter could stand still out next to the feeder and the birds would swarm around us and feed.  They seemed very curious about who we were and were not intimidated at all.  Because of this success I am relocating the feeder to my outdoor studio and placing a small perch adjacent to it.

Adding a Bird Bath
There simply is not enough water on our property to adequately allow the birds to drink and bathe. In theory adding this will keep the birds closer and increase their visits to the perches.

Adding Squirrel Baffles
Although I love to watch the little critters, they are not helpful to bird photographers.  They are large and interfere with the birds feeding.  Although not completely squirrel proof, the baffles will help keep them at bay.

ADDITIONAL FIELD WORK
In 2013 I did very little field work.  I did travel to a local aviary and take some shots but really did not do any non-captive photography.  This year my main thrust is the capture photos of the various species of Heron.  These birds have a strong population in this area and so make a logical choice.  I may also venture out on some local Audubon Society walks but that is not a high priority.

EQUIPMENT UPGRADE
This is an area with which most photographers struggle.  For me, the choice is between upgrading the glass or getting a second body in a 1.6 crop factor.  

Camera Body Upgrade Option
My current camera body is a Canon 1D Mark II and frankly it is a great camera.  It does however have some limitations which hurt me in the area of bird photography. The first problem is that the sensor only provides an 8 Megapixel resolution and this resolution makes it difficult for cropping. I took several good photographs this year which ended up in the junk pile simply because cropping would be impossible.  The second issue with the 1D Mark II is that its sensor is really useless past ISO 400 and tends to mimic what film is capable of.  The noise is very pronounced and in the case of long exposures has some very bad hot spots. Finally, the body only has a 1.3 crop factor which can be limiting when used with shorter telephoto lenses.  If I upgrade to a 15 MP 1.6 crop body, it will turn my telephoto lenses into  much better birding lenses.  This is the cheapest way to improve the equipment.

Lens Upgrade Option
Currently I shoot a Canon 70-210 F4 and a Canon 100-300 5.6.  The 70-210 is actually quite a performer for a consumer grade lens.  The 100-300 was purchased primarily as a filler lens until I can afford something better.  At the 300 range, the lens is soft, even at F8, but sharpening does improve it quite a bit.  I am looking at upgrading to the 70-200L lens used for around $600.00.  This is twice as much as I would spend on the body upgrade in the used market.  Upgrading to this lens also gives me the option to add special Canon teleconverters to increase magnification without loss of quality.  The reality of it is that image quality is mostly from the lens.  Even with my 8MP camera, coupled with an "L" lens it will produce great photos. If I go this route, I am looking at probably 1,000 dollars after I buy the teleconverter.  Unlikely I will be able to swing this this year but who knows.  

CONCLUSION
Well that is pretty much it for this year in my bird watching and photography.  The upgrades to the outdoor studio start this weekend and I should be in a position to purchase new equipment within 6 months.  I am leaning toward the body upgrade because the pros of it outweigh the pros of the lens upgrade currently, but that may change.